
Category:South Australian Railways
English: Category relating to South Australian Railways (1854-1975)
Subcategories
This category has the following 17 subcategories, out of 17 total.
A
- A. N. Day (1 F)
- Alan G Pendleton (7 F)
- Alexander B. Moncrieff (1 F)
- Alexander Bain Moncrieff (3 F)
B
- Bluebird railcar (16 F)
- Bob the Railway Dog (8 F)
- Charles James Boykett (4 F)
C
- Charles Buxton Anderson (1 F)
D
I
- Islington Railway Workshops (189 F)
J
- J. H. Smith (1 F)
- John Owen Critchley (empty)
P
S
W
Media in category "South Australian Railways"
The following 200 files are in this category, out of 382 total.
(previous page) (next page)-
 600BK at Newport Workshops Open Day March 2024.jpg 4,000 × 2,250; 2.37 MB
-
 844MtBarkerMay2024.jpg 6,000 × 4,000; 6.11 MB
-
–Port_Pirie_goods_train_timetable%2C_South_Australian_Railways%2C_1955.jpg/120px-Adelaide_(Mile_End)–Port_Pirie_goods_train_timetable%2C_South_Australian_Railways%2C_1955.jpg)
-
.jpg/120px-Adelaide_to_Victor_Harbor_railway_bus(GN12145).jpg) Adelaide to Victor Harbor railway bus(GN12145).jpg 3,264 × 2,448; 1.02 MB
Adelaide to Victor Harbor railway bus(GN12145).jpg 3,264 × 2,448; 1.02 MB
-
.jpg/120px-Adelaide_to_Victor_Harbor_railway_bus(GN12149).jpg) Adelaide to Victor Harbor railway bus(GN12149).jpg 3,264 × 2,448; 1.25 MB
Adelaide to Victor Harbor railway bus(GN12149).jpg 3,264 × 2,448; 1.25 MB
-
 Ashbury clerestory-roofed car at old Adelaide station, South Australian Railways.jpg 2,023 × 1,278; 2.1 MB
-
.jpg/120px-Axle_and_bearings_-_Islington_Railway_workshop(GN13086A).jpg) Axle and bearings - Islington Railway workshop(GN13086A).jpg 3,264 × 2,448; 966 KB
Axle and bearings - Islington Railway workshop(GN13086A).jpg 3,264 × 2,448; 966 KB
-
.jpg/120px-Axle_and_wheels_railway_locomotive_-_Islington_Railway_workshop(GN13090A).jpg) Axle and wheels railway locomotive - Islington Railway workshop(GN13090A).jpg 3,264 × 2,448; 1.06 MB
Axle and wheels railway locomotive - Islington Railway workshop(GN13090A).jpg 3,264 × 2,448; 1.06 MB
-
.jpg/120px-Bathroom_of_railway_commissioners_carriage(GN10144).jpg) Bathroom of railway commissioners carriage(GN10144).jpg 3,264 × 2,448; 778 KB
Bathroom of railway commissioners carriage(GN10144).jpg 3,264 × 2,448; 778 KB
-
.jpg/120px-Battery_Charger_South_Australian_Railways_Motor_Garage(GN06779).jpg) Battery Charger South Australian Railways Motor Garage(GN06779).jpg 3,264 × 2,448; 1.02 MB
Battery Charger South Australian Railways Motor Garage(GN06779).jpg 3,264 × 2,448; 1.02 MB
-
 Bluebird 257 Jacketts siding National Railway Museum, Port Adelaide 16 May 2021.jpg 5,722 × 3,815; 3.56 MB
-
 Bluebird 257 National Railway Museum, Port Adelaide 16 May 2021.jpg 3,837 × 2,558; 2.72 MB
-
 Bluebirds National Railway Museum, Port Adelaide 16 May 2021.jpg 6,000 × 4,000; 4.59 MB
-
.jpg/120px-Break_Down_Motor_Lorry_South_Australian_Railways(GN06767).jpg) Break Down Motor Lorry South Australian Railways(GN06767).jpg 3,264 × 2,448; 937 KB
Break Down Motor Lorry South Australian Railways(GN06767).jpg 3,264 × 2,448; 937 KB
-
.jpg/120px-Break_Down_Motor_Lorry(GN06789).jpg) Break Down Motor Lorry(GN06789).jpg 3,264 × 2,448; 783 KB
Break Down Motor Lorry(GN06789).jpg 3,264 × 2,448; 783 KB
-
.jpg/120px-Break_Down_Motor_Lorry(GN06792).jpg) Break Down Motor Lorry(GN06792).jpg 3,264 × 2,448; 978 KB
Break Down Motor Lorry(GN06792).jpg 3,264 × 2,448; 978 KB
-

-
.jpg/120px-Broken_chassis%2C_white_bus%2C_South_Australian_Railways(GN12254).jpg) Broken chassis, white bus, South Australian Railways(GN12254).jpg 3,264 × 2,448; 1.06 MB
Broken chassis, white bus, South Australian Railways(GN12254).jpg 3,264 × 2,448; 1.06 MB
-
.jpg/120px-Bullock_wagon_in_Ellen_Street%2C_Port_Pirie%2C_1906_(SLSA_PRG-280-1-1-322).jpg) Bullock wagon in Ellen Street, Port Pirie, 1906 (SLSA PRG-280-1-1-322).jpg 1,022 × 339; 230 KB
Bullock wagon in Ellen Street, Port Pirie, 1906 (SLSA PRG-280-1-1-322).jpg 1,022 × 339; 230 KB
-
.jpg/120px-Carriage_Windows_South_Australian_Railways(GN07050).jpg) Carriage Windows South Australian Railways(GN07050).jpg 3,264 × 2,448; 642 KB
Carriage Windows South Australian Railways(GN07050).jpg 3,264 × 2,448; 642 KB
-
.jpg/120px-Challenge_Shield_of_South_Australian_Railways_Ambulance(GN03160).jpg) Challenge Shield of South Australian Railways Ambulance(GN03160).jpg 3,264 × 2,448; 1,015 KB
Challenge Shield of South Australian Railways Ambulance(GN03160).jpg 3,264 × 2,448; 1,015 KB
-
.jpg/120px-Chief_Clerk_-_Mr_Christensen_of_SA_Railway(GN06716).jpg) Chief Clerk - Mr Christensen of SA Railway(GN06716).jpg 3,264 × 2,448; 775 KB
Chief Clerk - Mr Christensen of SA Railway(GN06716).jpg 3,264 × 2,448; 775 KB
-
 Chronology of railway gauge changes that affected Port Pirie.jpg 4,960 × 6,865; 4.16 MB
-
.jpg/120px-Coal_handling_plant_at_Terowie(GN13467).jpg) Coal handling plant at Terowie(GN13467).jpg 2,448 × 3,264; 892 KB
Coal handling plant at Terowie(GN13467).jpg 2,448 × 3,264; 892 KB
-
 Cockburn and Burns track layout.png 3,097 × 1,346; 437 KB
-
 Cockburn track layout.png 1,685 × 1,202; 240 KB
-
_on_South_Australian_Railways_Bluebird_railcar%2C_National_Railway_Museum_Port_Adelaide.jpg/120px-Commonwealth_design_truck_(bogie)_on_South_Australian_Railways_Bluebird_railcar%2C_National_Railway_Museum_Port_Adelaide.jpg)
-

-
 Comparison of narrow and standard gauge railway alignments in the same topography.png 3,508 × 2,479; 3.51 MB
-
 Composition of South Australian Railways passenger trains in the Murraylands, 1961.png 2,207 × 2,047; 267 KB
-
 Cross-section of Australian dual-gauge railway track.tif 2,338 × 1,653; 14.75 MB
-
 Cross-section of Australian triple-gauge track.png 2,338 × 1,653; 1.25 MB
-
.png/120px-Drawing_--_SAR_51_ft_clerestory-roofed_suburban_baggage_car_(cropped).png) Drawing -- SAR 51 ft clerestory-roofed suburban baggage car (cropped).png 3,208 × 943; 1.41 MB
Drawing -- SAR 51 ft clerestory-roofed suburban baggage car (cropped).png 3,208 × 943; 1.41 MB
-
 Drawing -- SAR 51 ft clerestory-roofed suburban baggage car cropped no title.png 3,208 × 826; 1.35 MB
-
 Drawing -- SAR 51 ft clerestory-roofed suburban baggage car.png 3,265 × 2,062; 2.62 MB
-
.png/120px-Drawing_--_South_Australian_Railways_and_Victorian_Railways_Pullman_sleeping_car_(cropped).png)
-
 Drawing -- South Australian Railways and Victorian Railways Pullman sleeping car.png 4,545 × 3,204; 5.87 MB
-
 Drawing -- South Australian Railways Ashbury car, 1884 cropped.png 2,140 × 917; 1.5 MB
-
.png/120px-Drawing_--_South_Australian_Railways_Pullman_dining_car_%27Adelaide%27_(cropped).png) Drawing -- South Australian Railways Pullman dining car 'Adelaide' (cropped).png 3,536 × 687; 1.25 MB
Drawing -- South Australian Railways Pullman dining car 'Adelaide' (cropped).png 3,536 × 687; 1.25 MB
-
 Drawing -- South Australian Railways Pullman dining car 'Adelaide'.png 4,550 × 2,783; 4.59 MB
-

-
 Drawings of South Australian Railways 820 class wooden-bodied suburban railcar trailer.png 3,508 × 2,314; 2.54 MB
-
.png/120px-Drawings_of_South_Australian_Railways_locomotive_no._1_(Peter_Manning).png) Drawings of South Australian Railways locomotive no. 1 (Peter Manning).png 2,288 × 1,506; 434 KB
Drawings of South Australian Railways locomotive no. 1 (Peter Manning).png 2,288 × 1,506; 434 KB
-
.jpg/120px-Dual_and_triple-gauge_turnout%2C_Gladstone_South_Australia_001_(HSWilliams).jpg) Dual and triple-gauge turnout, Gladstone South Australia 001 (HSWilliams).jpg 3,360 × 5,040; 3.89 MB
Dual and triple-gauge turnout, Gladstone South Australia 001 (HSWilliams).jpg 3,360 × 5,040; 3.89 MB
-
.jpg/120px-Dual_and_triple-gauge_turnout%2C_Gladstone%2C_South_Australia_002_(HSWilliams).jpg) Dual and triple-gauge turnout, Gladstone, South Australia 002 (HSWilliams).jpg 3,314 × 4,808; 3.54 MB
Dual and triple-gauge turnout, Gladstone, South Australia 002 (HSWilliams).jpg 3,314 × 4,808; 3.54 MB
-
.jpg/120px-Ellen_Street_station_and_%27Long_Tom%27_brake_van_on_passenger_train%2C_1947_(SLSA_B_19252).jpg)
-
.jpg/120px-Ellen_Street_station_and_arriving_train_headed_by_SAR_loco_624%2C_1937_(SLSA_B_23647).jpg)
-
.jpg/120px-Ellen_Street_station_and_passenger_train_headed_by_SAR_loco_522%2C_Port_Pirie%2C_early_1950s_(NRM_AZ04913).jpg)
-
.jpg/120px-Ellen_Street_station_and_passenger_train_headed_by_SAR_loco_625%2C_1940_(SLSA_B_30245).jpg)
-
.jpg/120px-Ellen_Street_station_and_streetscape%2C_1914_(SLSA_PRG-280-1-10-47).jpg) Ellen Street station and streetscape, 1914 (SLSA PRG-280-1-10-47).jpg 1,024 × 565; 321 KB
Ellen Street station and streetscape, 1914 (SLSA PRG-280-1-10-47).jpg 1,024 × 565; 321 KB
-
.jpg/120px-Ellen_Street_station_and_Y_class_locomotive_no._104%2C_about_1930_(SLSA_B_22810).jpg)
-
.jpg/120px-Ellen_Street_station%2C_about_1929%2C_front_on_(SLSA_B_43855).jpg) Ellen Street station, about 1929, front on (SLSA B 43855).jpg 907 × 632; 516 KB
Ellen Street station, about 1929, front on (SLSA B 43855).jpg 907 × 632; 516 KB
-
.jpg/120px-Ellen_Street_station%2C_Port_Pirie%2C_looking_south%2C_about_1904_(SLSA_B_11421).jpg) Ellen Street station, Port Pirie, looking south, about 1904 (SLSA B 11421).jpg 1,024 × 569; 315 KB
Ellen Street station, Port Pirie, looking south, about 1904 (SLSA B 11421).jpg 1,024 × 569; 315 KB
-
.jpg/120px-Ellen_Street_station%2C_train_and_crowd%2C_1904_(colour-added%2C_photographer-modified_postcard_--_SLSA_B_11616).jpg)
-
.jpg/120px-Ellen_Street_station%2C_train_and_streetscape%2C_about_1920_(SLSA_B_16583).jpg)
-
.jpg/120px-Ellen_Street%2C_about_1904_(SLSA_B_9785).jpg) Ellen Street, about 1904 (SLSA B 9785).jpg 964 × 657; 647 KB
Ellen Street, about 1904 (SLSA B 9785).jpg 964 × 657; 647 KB
-
.jpg/120px-Ellen_Street%2C_Port_Pirie%2C_and_train%2C_about_1900_(SLSA_B_55173).jpg) Ellen Street, Port Pirie, and train, about 1900 (SLSA B 55173).jpg 1,024 × 679; 492 KB
Ellen Street, Port Pirie, and train, about 1900 (SLSA B 55173).jpg 1,024 × 679; 492 KB
-
 End view of South Australian Railways 17-window Centenary car.jpg 2,592 × 1,944; 4.6 MB
-
.png/120px-Evolution_of_the_Adelaide–Darwin_rail_corridor_(2_phases).png) Evolution of the Adelaide–Darwin rail corridor (2 phases).png 3,361 × 2,479; 708 KB
Evolution of the Adelaide–Darwin rail corridor (2 phases).png 3,361 × 2,479; 708 KB
-
.jpg/120px-Exterior_of_a_Railway_Carriage(GN07101).jpg) Exterior of a Railway Carriage(GN07101).jpg 3,264 × 2,448; 736 KB
Exterior of a Railway Carriage(GN07101).jpg 3,264 × 2,448; 736 KB
-
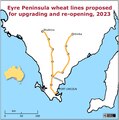 Eyre Peninsula wheat lines proposed for upgrading and re-opening, 2023.tif 1,110 × 1,116; 3.55 MB
-
.jpg/120px-Fageol_Rail_Car_Islington(GN06894).jpg) Fageol Rail Car Islington(GN06894).jpg 3,264 × 2,448; 454 KB
Fageol Rail Car Islington(GN06894).jpg 3,264 × 2,448; 454 KB
-
.jpg/120px-Farewell_Banquet_for_Mr_Webb_Chief_Commissioner_of_Railways(GN07046).jpg) Farewell Banquet for Mr Webb Chief Commissioner of Railways(GN07046).jpg 3,264 × 2,448; 875 KB
Farewell Banquet for Mr Webb Chief Commissioner of Railways(GN07046).jpg 3,264 × 2,448; 875 KB
-
 FDDY 2 Virginia 17 September 2022.jpg 3,967 × 2,645; 2.93 MB
-
 FDDY 3 Virginia 23 October 2021.jpg 1,611 × 1,074; 407 KB
-
 FDDY 5 Yumali 2 April 2023.jpg 4,227 × 2,818; 2.27 MB
-
.jpg/120px-First_railway_station_Port_Pirie_1881_(SLSA_B_10440).jpg) First railway station Port Pirie 1881 (SLSA B 10440).jpg 1,018 × 568; 284 KB
First railway station Port Pirie 1881 (SLSA B 10440).jpg 1,018 × 568; 284 KB
-
 Flinders Ranges and routes of Central Australia Railway & Marree line.tif 1,653 × 2,338; 14.75 MB
-
 Four passenger trains at Bridgewater, about 1937 or 1938.jpg 829 × 470; 265 KB
-
.jpg/120px-Front_View_of_Railways_Mail_Van(GN07122).jpg) Front View of Railways Mail Van(GN07122).jpg 3,264 × 2,448; 867 KB
Front View of Railways Mail Van(GN07122).jpg 3,264 × 2,448; 867 KB
-
.jpg/120px-Front_View_of_Zebra_Rail_Motor(GN07123).jpg) Front View of Zebra Rail Motor(GN07123).jpg 3,264 × 2,448; 872 KB
Front View of Zebra Rail Motor(GN07123).jpg 3,264 × 2,448; 872 KB
-
 Gawler railway station building, 2007.jpg 1,579 × 781; 326 KB
-

-
_(NRM_RA14843).jpg/120px-Glenelg_Railway_Co_passenger_car_(13-window%2C_clerestory-roofed)_(NRM_RA14843).jpg)
-
.jpg/120px-Glenelg_Railway_Company_40_ft_end-loading_passenger_car%2C_1890_(NRM_1-1-14843).jpg)
-

-
.jpg/120px-Goods_being_assembled_at_Oodnadatta_railway_station_for_northwards_transport_by_camel%2C_ca_1902_(SLSA_B_64153-34).jpg)
-
.jpg/120px-Group_of_Railway_Employees(GN07059).jpg) Group of Railway Employees(GN07059).jpg 3,264 × 2,448; 937 KB
Group of Railway Employees(GN07059).jpg 3,264 × 2,448; 937 KB
-
 Heathfield railway station site March 2022.jpg 2,048 × 1,536; 1.91 MB
-
.jpg/120px-House_by_the_Railway_Line(GN00795).jpg) House by the Railway Line(GN00795).jpg 3,264 × 2,448; 1.01 MB
House by the Railway Line(GN00795).jpg 3,264 × 2,448; 1.01 MB
-
.jpg/120px-House_by_the_Railway_Line(GN00796).jpg) House by the Railway Line(GN00796).jpg 3,264 × 2,448; 1.04 MB
House by the Railway Line(GN00796).jpg 3,264 × 2,448; 1.04 MB
-
.jpg/120px-Interior_of_a_South_Australian_Railways_%27Bluebird%27_railcar_(250_class_second-class_passenger_power_car).jpg)
-
.jpg/120px-Labourers_shovelling_barytes_ore_from_narrow_to_broad_gauge_wagons%2C_Terowie_railway_station%2C_1909_(SLSA_B_32911).jpg)
-
 Lake MacDonnell-Thevenard gypsum line location.png 741 × 589; 55 KB
-
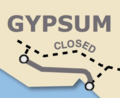 Lake MacDonnell-Thevenard gypsum line mini map.png 291 × 238; 71 KB
-
 Layout of Mary Elie Street station and sidings, Port Pirie, South Australia.tif 1,481 × 2,338; 13.21 MB
-
_(State_Records_GRG7-128-5).jpg/120px-Leigh_Creek_coalfields_1950s_(SA_Tourist_Bureau)_(State_Records_GRG7-128-5).jpg) Leigh Creek coalfields 1950s (SA Tourist Bureau) (State Records GRG7-128-5).jpg 3,123 × 1,642; 3.56 MB
Leigh Creek coalfields 1950s (SA Tourist Bureau) (State Records GRG7-128-5).jpg 3,123 × 1,642; 3.56 MB
-
.jpg/120px-Loading_railway_cattle_cars_at_Cockburn_SA%2C_1932_--_also_stock_pens_and_SAR_loco_T203_(SLSA_B_39564).jpg)
-
 Loading vehicles on to train at GMH Elizabeth.jpg 931 × 597; 130 KB
-
_at_Port_Pirie_ca_1950_(right-hand_side_of_SLSA_B_23640).jpg/120px-Location_of_narrow-gauge_Solomontown_station_(centre%2C_where_girl_is)_at_Port_Pirie_ca_1950_(right-hand_side_of_SLSA_B_23640).jpg)
-
_at_Islington_Workshops_13_July_2023.jpg/120px-Locomotive-hauled_car_BM259_(former_SAR_Bluebird_railcar)_at_Islington_Workshops_13_July_2023.jpg)
-
 Madurta railway station site April 2021.jpg 1,889 × 1,416; 1.35 MB
-
.jpg/120px-Man_riding_Railway_Motor_Tricycle_-_South_Australian_Railway_negatives(GN03169).jpg) Man riding Railway Motor Tricycle - South Australian Railway negatives(GN03169).jpg 3,264 × 2,448; 1.28 MB
Man riding Railway Motor Tricycle - South Australian Railway negatives(GN03169).jpg 3,264 × 2,448; 1.28 MB
-
 Map of Eyre Peninsula railway lines in 2019.png 2,002 × 1,441; 605 KB
-
_1913.jpg/120px-Map_of_Murraylands_railway_lines_(South_Australian_Railways)_1913.jpg) Map of Murraylands railway lines (South Australian Railways) 1913.jpg 890 × 933; 165 KB
Map of Murraylands railway lines (South Australian Railways) 1913.jpg 890 × 933; 165 KB
-
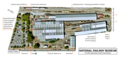 Map of National Railway Museum premises, South Australia, in 2021.tif 2,202 × 1,045; 8.78 MB
-
_with_railway_lines_to_Alice_Springs_overlaid.png/120px-Map_of_population_density%2C_South_Australia_and_southern_Northern_Territory_(2018)_with_railway_lines_to_Alice_Springs_overlaid.png)
-
 Map of Port Pirie railways, stations and Coonamia stopping place.png 1,706 × 1,536; 2.19 MB
-
 Map of South Australian Railways lines in 1958.png 13,090 × 20,515; 85.5 MB
-
 Map of South Australian Railways lines in 1971.png 4,524 × 3,837; 21.71 MB
-
 Map of South Australian Railways Penfield Branch.tif 1,211 × 2,214; 7.68 MB
-
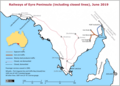
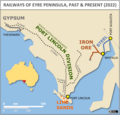 Map of the railways of Eyre Peninsula, South Australia, past and present.png 1,305 × 1,250; 345 KB
-
 Marree railway station early 20th century.jpg 980 × 342; 188 KB
-
 Marree railway station yard from water tank, about 1900.jpg 986 × 499; 287 KB
-
.jpg/120px-Men_laying_rail_on_embankment%2C_Wire_Creek_to_Alice_Springs_section_of_Central_Australia_Railway%2C_mid-1920s_(Joe_Davis%2C_LANT_NTRS573_item_58).jpg)
-
_station_yard_layout_diagram%2C_1912_and_1970.jpg/120px-Milang_(South_Australia)_station_yard_layout_diagram%2C_1912_and_1970.jpg) Milang (South Australia) station yard layout diagram, 1912 and 1970.jpg 1,949 × 1,318; 245 KB
Milang (South Australia) station yard layout diagram, 1912 and 1970.jpg 1,949 × 1,318; 245 KB
-
.jpg/120px-Mile_End_Railway_Ambulance_Van(GN06967).jpg) Mile End Railway Ambulance Van(GN06967).jpg 3,264 × 2,448; 1.03 MB
Mile End Railway Ambulance Van(GN06967).jpg 3,264 × 2,448; 1.03 MB
-
_train_on_the_Great_Northern_Railway%2C_South_Australia_(later%2C_Central_Australia_Railway)%2C_travelling_south_between_Hookina_railway_siding_and_Hawker%2C_about_1910.jpg/120px-thumbnail.jpg)
-
_2016.jpg/120px-Moonta_railway_station_building_(former_South_Australian_Railways)_2016.jpg) Moonta railway station building (former South Australian Railways) 2016.jpg 1,795 × 965; 1.49 MB
Moonta railway station building (former South Australian Railways) 2016.jpg 1,795 × 965; 1.49 MB
-
.jpg/120px-Morris_Rail_Motor(GN07118).jpg) Morris Rail Motor(GN07118).jpg 3,264 × 2,448; 816 KB
Morris Rail Motor(GN07118).jpg 3,264 × 2,448; 816 KB
-
.jpg/120px-Morris_Rail_Motor(GN07126).jpg) Morris Rail Motor(GN07126).jpg 3,264 × 2,448; 914 KB
Morris Rail Motor(GN07126).jpg 3,264 × 2,448; 914 KB
-
.jpg/120px-Motor_Lorry(GN12154).jpg) Motor Lorry(GN12154).jpg 3,264 × 2,448; 1.01 MB
Motor Lorry(GN12154).jpg 3,264 × 2,448; 1.01 MB
-
.jpg/120px-Motor_Lorry(GN12154A).jpg) Motor Lorry(GN12154A).jpg 3,264 × 2,448; 1.14 MB
Motor Lorry(GN12154A).jpg 3,264 × 2,448; 1.14 MB
-
.jpg/120px-Motor_Powered_Gangers_Section_Car_at_Islington(GN06978).jpg) Motor Powered Gangers Section Car at Islington(GN06978).jpg 3,264 × 2,448; 922 KB
Motor Powered Gangers Section Car at Islington(GN06978).jpg 3,264 × 2,448; 922 KB
-
.jpg/120px-Motor_Powered_Gangers_Section_Car_at_Islington(GN06981).jpg) Motor Powered Gangers Section Car at Islington(GN06981).jpg 3,264 × 2,448; 716 KB
Motor Powered Gangers Section Car at Islington(GN06981).jpg 3,264 × 2,448; 716 KB
-
.jpg/120px-Motor_Powered_Gangers_Section_Car_at_Islington(GN06984).jpg) Motor Powered Gangers Section Car at Islington(GN06984).jpg 3,264 × 2,448; 994 KB
Motor Powered Gangers Section Car at Islington(GN06984).jpg 3,264 × 2,448; 994 KB
-
 New Port Dock Railway Station celebration biscuits cookies.jpg 2,729 × 1,866; 747 KB
-
 New Port Dock Railway Station opening day.jpg 4,032 × 3,024; 3.59 MB
-
 New Port Dock Railway Station sign.jpg 4,032 × 3,024; 2.44 MB
-

-
.jpg/120px-Old_rail_motor_inspection_cars(GN12551).jpg) Old rail motor inspection cars(GN12551).jpg 3,264 × 2,448; 716 KB
Old rail motor inspection cars(GN12551).jpg 3,264 × 2,448; 716 KB
-
.png/120px-One_of_the_inaugural_trio_of_South_Australian_Railways_locomotives_delivered_in_1856_(photographed_about_1870).png)
-
_1925.jpg/120px-Oodnadatta–Marree_timetable_(on_SAR_Central_Australia_Railway)_1925.jpg) Oodnadatta–Marree timetable (on SAR Central Australia Railway) 1925.jpg 896 × 966; 161 KB
Oodnadatta–Marree timetable (on SAR Central Australia Railway) 1925.jpg 896 × 966; 161 KB
-
_Port_Pirie_station_building_and_Budd_car%2C_Nov_1967_(Ken_Brine_NRM_1-3-s04692).jpg/120px-Original_(1876)_Port_Pirie_station_building_and_Budd_car%2C_Nov_1967_(Ken_Brine_NRM_1-3-s04692).jpg)
-
.jpg/120px-Passenger_cars_under_construction_at_Islington_Workshops_ca_1909_(SLSA_PRG-280-1-4-218).jpg)
-
 PDAY 3 Mallala 12 October 2022.jpg 4,753 × 3,169; 5.67 MB
-
_rail_maps_1919-2019.tif/lossless-page1-68px-Penong-Kevin-Thevenard_(Eyre_Peninsula)_rail_maps_1919-2019.tif.png) Penong-Kevin-Thevenard (Eyre Peninsula) rail maps 1919-2019.tif 1,284 × 2,255; 11.05 MB
Penong-Kevin-Thevenard (Eyre Peninsula) rail maps 1919-2019.tif 1,284 × 2,255; 11.05 MB
-
 Pie chart -- South Australian end-loading passenger car builders.png 3,250 × 2,480; 852 KB
-
_and_Burns_(Silverton_Tramway_Company)_railway_station_yards_and_surrounds.tif/lossy-page1-120px-Plan_of_Cockburn_(South_Australian_Railways)_and_Burns_(Silverton_Tramway_Company)_railway_station_yards_and_surrounds.tif.jpg)
-
 Port Broughton to Mundoora 3 ft 6 in gauge tramway.jpg 1,024 × 611; 310 KB
-
.jpg/120px-Port_Dock_railway_station%2C_24_August_2024_(day_before_opening).jpg) Port Dock railway station, 24 August 2024 (day before opening).jpg 3,882 × 1,755; 5.58 MB
Port Dock railway station, 24 August 2024 (day before opening).jpg 3,882 × 1,755; 5.58 MB
-
 Port Dock Railway Station.jpg 4,080 × 3,072; 3.19 MB
-
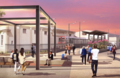 Port Dock station impression.png 1,400 × 912; 1.94 MB
-
_with_East-west_Express_and_school_train_ca_1950_(SLSA_B_23640).jpg/120px-Port_Pirie_Junction_station_(Solomontown)_with_East-west_Express_and_school_train_ca_1950_(SLSA_B_23640).jpg)
-
.jpg/120px-Port_Pirie_ore_train_from_Broken_Hill_at_Solomontown_about_1951_(SLSA_B_58892-499).jpg)
-
.jpg/120px-Port_Pirie_Post_Office_and_Ellen_Street_station%2C_about_1905_(photographer-modified_postcard_--_SLSA_B_39575).jpg)
-
.jpg/120px-Port_Pirie_smelters_--_coming_off_shift_circa_1904_(SLSA_B_11617).jpg) Port Pirie smelters -- coming off shift circa 1904 (SLSA B 11617).jpg 948 × 574; 524 KB
Port Pirie smelters -- coming off shift circa 1904 (SLSA B 11617).jpg 948 × 574; 524 KB
-
 Port Pirie South railway station yards 1909, Y class loco hauling mixed train on right.jpg 2,866 × 1,798; 2.68 MB
-
.jpg/120px-Port_Pirie_South_railway_yard%2C_looking_north%2C_about_1910_(SLSA_B_39865).jpg)
-
%2C_1920.tif/lossless-page1-120px-Port_Pirie_South_track_layout_(narrow_gauge)%2C_1920.tif.png) Port Pirie South track layout (narrow gauge), 1920.tif 2,313 × 854; 7.54 MB
Port Pirie South track layout (narrow gauge), 1920.tif 2,313 × 854; 7.54 MB
-
.jpg/120px-Porter_demonstrating_railway_hand_signals(GN12239).jpg) Porter demonstrating railway hand signals(GN12239).jpg 2,448 × 3,264; 963 KB
Porter demonstrating railway hand signals(GN12239).jpg 2,448 × 3,264; 963 KB
-
.jpg/120px-Porter_demonstrating_railway_hand_signals(GN12240).jpg) Porter demonstrating railway hand signals(GN12240).jpg 2,448 × 3,264; 872 KB
Porter demonstrating railway hand signals(GN12240).jpg 2,448 × 3,264; 872 KB
-
.jpg/120px-Porter_demonstrating_railway_hand_signals(GN12241).jpg) Porter demonstrating railway hand signals(GN12241).jpg 2,448 × 3,264; 960 KB
Porter demonstrating railway hand signals(GN12241).jpg 2,448 × 3,264; 960 KB
-
.jpg/120px-Porter_demonstrating_railway_hand_signals(GN12242).jpg) Porter demonstrating railway hand signals(GN12242).jpg 2,448 × 3,264; 933 KB
Porter demonstrating railway hand signals(GN12242).jpg 2,448 × 3,264; 933 KB
-
.jpg/120px-Porter_demonstrating_railway_hand_signals(GN12245).jpg) Porter demonstrating railway hand signals(GN12245).jpg 2,448 × 3,264; 719 KB
Porter demonstrating railway hand signals(GN12245).jpg 2,448 × 3,264; 719 KB
-
.jpg/120px-Porter_demonstrating_railway_hand_signals(GN12246).jpg) Porter demonstrating railway hand signals(GN12246).jpg 2,448 × 3,264; 1.03 MB
Porter demonstrating railway hand signals(GN12246).jpg 2,448 × 3,264; 1.03 MB
-
.jpg/120px-Porter_demonstrating_railway_hand_signals(GN12247).jpg) Porter demonstrating railway hand signals(GN12247).jpg 2,448 × 3,264; 901 KB
Porter demonstrating railway hand signals(GN12247).jpg 2,448 × 3,264; 901 KB
-
.jpg/120px-Porter_demonstrating_railway_hand_signals(GN12249).jpg) Porter demonstrating railway hand signals(GN12249).jpg 2,448 × 3,264; 1.14 MB
Porter demonstrating railway hand signals(GN12249).jpg 2,448 × 3,264; 1.14 MB
-
.jpg/120px-Porter_demonstrating_railway_hand_signals(GN12251).jpg) Porter demonstrating railway hand signals(GN12251).jpg 2,448 × 3,264; 828 KB
Porter demonstrating railway hand signals(GN12251).jpg 2,448 × 3,264; 828 KB
-
.jpg/120px-Porter_demonstrating_railway_lantern_signals(GN12253).jpg) Porter demonstrating railway lantern signals(GN12253).jpg 2,448 × 3,264; 786 KB
Porter demonstrating railway lantern signals(GN12253).jpg 2,448 × 3,264; 786 KB
-
.jpg/120px-Portrait_of_Commissioner_Webb_-_South_Australian_Railways(GN12277).jpg) Portrait of Commissioner Webb - South Australian Railways(GN12277).jpg 2,448 × 3,264; 1.19 MB
Portrait of Commissioner Webb - South Australian Railways(GN12277).jpg 2,448 × 3,264; 1.19 MB
-
.jpg/120px-Portrait_of_Mr_J._McGuire_-_South_Australian_Railways(GN12271).jpg) Portrait of Mr J. McGuire - South Australian Railways(GN12271).jpg 2,448 × 3,264; 920 KB
Portrait of Mr J. McGuire - South Australian Railways(GN12271).jpg 2,448 × 3,264; 920 KB
-
.jpg/120px-Portrait_of_Mr_M._Dyke_-_South_Australian_Railways(GN12267).jpg) Portrait of Mr M. Dyke - South Australian Railways(GN12267).jpg 2,448 × 3,264; 924 KB
Portrait of Mr M. Dyke - South Australian Railways(GN12267).jpg 2,448 × 3,264; 924 KB
-
.jpg/120px-Portrait_of_Mr_W._Rutt_-_South_Australian_Railways(GN12268).jpg) Portrait of Mr W. Rutt - South Australian Railways(GN12268).jpg 2,448 × 3,264; 1.19 MB
Portrait of Mr W. Rutt - South Australian Railways(GN12268).jpg 2,448 × 3,264; 1.19 MB
-
.jpg/120px-Portrait_of_Mr_Webb(GN07069).jpg) Portrait of Mr Webb(GN07069).jpg 2,448 × 3,264; 769 KB
Portrait of Mr Webb(GN07069).jpg 2,448 × 3,264; 769 KB
-
_track%2C_South_Australian_Railways.jpg/120px-Rail_baseplate_on_dual_gauge_(1435_and_1600_mm)_track%2C_South_Australian_Railways.jpg) Rail baseplate on dual gauge (1435 and 1600 mm) track, South Australian Railways.jpg 1,177 × 1,174; 494 KB
Rail baseplate on dual gauge (1435 and 1600 mm) track, South Australian Railways.jpg 1,177 × 1,174; 494 KB
-
.jpg/120px-Rail_Car_at_Unley_Park_Railway_Crossing(GN12005).jpg) Rail Car at Unley Park Railway Crossing(GN12005).jpg 3,264 × 2,448; 798 KB
Rail Car at Unley Park Railway Crossing(GN12005).jpg 3,264 × 2,448; 798 KB
-
 Rail map -- Port Augusta, Port Pirie routes before and after 1937.png 1,242 × 1,517; 2.22 MB
-
.jpg/120px-Railcar_No._42_at_Adelaide_Railway_Station(GN07195).jpg) Railcar No. 42 at Adelaide Railway Station(GN07195).jpg 3,264 × 2,448; 805 KB
Railcar No. 42 at Adelaide Railway Station(GN07195).jpg 3,264 × 2,448; 805 KB
-
.jpg/120px-Railcar_Windows_South_Australian_Railways(GN07052).jpg) Railcar Windows South Australian Railways(GN07052).jpg 3,264 × 2,448; 550 KB
Railcar Windows South Australian Railways(GN07052).jpg 3,264 × 2,448; 550 KB
-
.jpg/120px-Railway_Ambulance_Gladstone_Squad(GN07018).jpg) Railway Ambulance Gladstone Squad(GN07018).jpg 3,264 × 2,448; 1,008 KB
Railway Ambulance Gladstone Squad(GN07018).jpg 3,264 × 2,448; 1,008 KB
-
.jpg/120px-Railway_Ambulance_Squad%2C_Gladstone(GN13489).jpg) Railway Ambulance Squad, Gladstone(GN13489).jpg 3,264 × 2,448; 1.02 MB
Railway Ambulance Squad, Gladstone(GN13489).jpg 3,264 × 2,448; 1.02 MB
-
.jpg/120px-Railway_Bus_-_Victor_Harbor_Service(GN12153).jpg) Railway Bus - Victor Harbor Service(GN12153).jpg 3,264 × 2,448; 974 KB
Railway Bus - Victor Harbor Service(GN12153).jpg 3,264 × 2,448; 974 KB
-
.jpg/120px-Railway_Carriage_Interior_-_Showing_Tables_and_Chairs(GN09280).jpg) Railway Carriage Interior - Showing Tables and Chairs(GN09280).jpg 3,264 × 2,448; 1.08 MB
Railway Carriage Interior - Showing Tables and Chairs(GN09280).jpg 3,264 × 2,448; 1.08 MB
-
.jpg/120px-Railway_carriage_interior(GN13452).jpg) Railway carriage interior(GN13452).jpg 3,264 × 2,448; 941 KB
Railway carriage interior(GN13452).jpg 3,264 × 2,448; 941 KB
-
%2C_Railway_Commisioner%27s_Report(GN12067).jpg/120px-Railway_Carriage_on_tracks_(ambulance_carriage)%2C_Railway_Commisioner%27s_Report(GN12067).jpg)
-
.jpg/120px-Railway_Carriage(GN07028).jpg) Railway Carriage(GN07028).jpg 3,264 × 2,448; 743 KB
Railway Carriage(GN07028).jpg 3,264 × 2,448; 743 KB
-
.jpg/120px-Railway_Commissioner_Office_Staff_Mr_Christisons_Retirement(GN07006).jpg) Railway Commissioner Office Staff Mr Christisons Retirement(GN07006).jpg 3,264 × 2,448; 1,021 KB
Railway Commissioner Office Staff Mr Christisons Retirement(GN07006).jpg 3,264 × 2,448; 1,021 KB
-
.jpg/120px-Railway_Commissioner_Webb_and_Staff(GN13745).jpg) Railway Commissioner Webb and Staff(GN13745).jpg 3,264 × 2,448; 886 KB
Railway Commissioner Webb and Staff(GN13745).jpg 3,264 × 2,448; 886 KB
-
.jpg/120px-Railway_Cottage(GN00798A).jpg) Railway Cottage(GN00798A).jpg 3,264 × 2,448; 749 KB
Railway Cottage(GN00798A).jpg 3,264 × 2,448; 749 KB
-
.jpg/120px-Railway_Delivery_Service_Van_Outside_a_House_Man_Carrying_Suitcases(GN07004).jpg) Railway Delivery Service Van Outside a House Man Carrying Suitcases(GN07004).jpg 3,264 × 2,448; 753 KB
Railway Delivery Service Van Outside a House Man Carrying Suitcases(GN07004).jpg 3,264 × 2,448; 753 KB
-
.jpg/120px-Railway_Delivery_Service_Van_Outside_a_House_Man_Carrying_Suitcases(GN07005).jpg) Railway Delivery Service Van Outside a House Man Carrying Suitcases(GN07005).jpg 3,264 × 2,448; 737 KB
Railway Delivery Service Van Outside a House Man Carrying Suitcases(GN07005).jpg 3,264 × 2,448; 737 KB
-
.jpg/120px-Railway_Ford_Ambulance_Showing_Interior(GN06962).jpg) Railway Ford Ambulance Showing Interior(GN06962).jpg 3,264 × 2,448; 534 KB
Railway Ford Ambulance Showing Interior(GN06962).jpg 3,264 × 2,448; 534 KB
-
.jpg/120px-Railway_Line_-_the_railway_ran_to_the_showgrounds_on_Frome_Road%2C_looking_east(GN03223).jpg) Railway Line - the railway ran to the showgrounds on Frome Road, looking east(GN03223).jpg 3,264 × 2,448; 1,015 KB
Railway Line - the railway ran to the showgrounds on Frome Road, looking east(GN03223).jpg 3,264 × 2,448; 1,015 KB
-
.jpg/120px-Railway_Lines_at_Roseworthy(GN12000).jpg) Railway Lines at Roseworthy(GN12000).jpg 3,167 × 2,191; 3.05 MB
Railway Lines at Roseworthy(GN12000).jpg 3,167 × 2,191; 3.05 MB
-
.jpg/120px-Railway_Locomotive_-_South_Australian_Railways(GN12071).jpg) Railway Locomotive - South Australian Railways(GN12071).jpg 3,264 × 2,448; 859 KB
Railway Locomotive - South Australian Railways(GN12071).jpg 3,264 × 2,448; 859 KB
-
.jpg/120px-Railway_machinery_for_carriage_lifting(GN00610).jpg) Railway machinery for carriage lifting(GN00610).jpg 3,264 × 2,448; 988 KB
Railway machinery for carriage lifting(GN00610).jpg 3,264 × 2,448; 988 KB
-
.jpg/120px-Railway_Motor_Tricycle_on_display_-_South_Australian_Railway_negatives(GN03167).jpg) Railway Motor Tricycle on display - South Australian Railway negatives(GN03167).jpg 3,264 × 2,448; 1.07 MB
Railway Motor Tricycle on display - South Australian Railway negatives(GN03167).jpg 3,264 × 2,448; 1.07 MB
-
_(cropped).jpg/120px-Railway_Motor_Tricycle_on_display_-_South_Australian_Railway_negatives(GN03173)_(cropped).jpg)
-
.jpg/120px-Railway_Motor_Tricycle_on_display_-_South_Australian_Railway_negatives(GN03173).jpg) Railway Motor Tricycle on display - South Australian Railway negatives(GN03173).jpg 3,264 × 2,448; 820 KB
Railway Motor Tricycle on display - South Australian Railway negatives(GN03173).jpg 3,264 × 2,448; 820 KB
-
.jpg/120px-Railway_Motor_Tricycle(GN05045).jpg) Railway Motor Tricycle(GN05045).jpg 3,264 × 2,448; 400 KB
Railway Motor Tricycle(GN05045).jpg 3,264 × 2,448; 400 KB
-
.jpg/120px-Railway_Porter_demonstrating_railway_hand_signals(GN12244).jpg) Railway Porter demonstrating railway hand signals(GN12244).jpg 2,448 × 3,264; 922 KB
Railway Porter demonstrating railway hand signals(GN12244).jpg 2,448 × 3,264; 922 KB
-
.jpg/120px-Railway_Standing_Committee(GN14042).jpg) Railway Standing Committee(GN14042).jpg 3,264 × 2,448; 1.25 MB
Railway Standing Committee(GN14042).jpg 3,264 × 2,448; 1.25 MB
-
.jpg/120px-Railway_Station_Committee_Department(GN05194).jpg) Railway Station Committee Department(GN05194).jpg 3,264 × 2,448; 947 KB
Railway Station Committee Department(GN05194).jpg 3,264 × 2,448; 947 KB
-
 Railway station employee at cottage in Mile End, South Australia.jpg 884 × 782; 404 KB
-
.jpg/120px-Railway_Station_with_locomotive(GN11440).jpg) Railway Station with locomotive(GN11440).jpg 3,264 × 2,448; 862 KB
Railway Station with locomotive(GN11440).jpg 3,264 × 2,448; 862 KB
-
.jpg/120px-Railway_station_yard_at_Oodnadatta%2C_South_Australia_ca_1897_(SLSA_PRG-1610-11-48_Robert_Mitchell).jpg)
-
.jpg/120px-Railway_station(GN00142).jpg) Railway station(GN00142).jpg 3,264 × 2,448; 997 KB
Railway station(GN00142).jpg 3,264 × 2,448; 997 KB
-
.jpg/120px-Railway_Tricycle(GN12555).jpg) Railway Tricycle(GN12555).jpg 3,264 × 2,448; 1.04 MB
Railway Tricycle(GN12555).jpg 3,264 × 2,448; 1.04 MB
-
.jpg/120px-Railway_Tricycle(GN12556).jpg) Railway Tricycle(GN12556).jpg 3,264 × 2,448; 1.01 MB
Railway Tricycle(GN12556).jpg 3,264 × 2,448; 1.01 MB
-
.jpg/120px-Railway_Truck(GN12688).jpg) Railway Truck(GN12688).jpg 3,264 × 2,448; 873 KB
Railway Truck(GN12688).jpg 3,264 × 2,448; 873 KB
-
.jpg/120px-Railways_Commissioners_Office_Mr_Webb(GN06713).jpg) Railways Commissioners Office Mr Webb(GN06713).jpg 3,264 × 2,448; 874 KB
Railways Commissioners Office Mr Webb(GN06713).jpg 3,264 × 2,448; 874 KB
-
.jpg/120px-Railways_delivery_van(GN12147).jpg) Railways delivery van(GN12147).jpg 3,264 × 2,448; 1.11 MB
Railways delivery van(GN12147).jpg 3,264 × 2,448; 1.11 MB
-
.jpg/120px-Railways_delivery_van(GN12150).jpg) Railways delivery van(GN12150).jpg 3,264 × 2,448; 983 KB
Railways delivery van(GN12150).jpg 3,264 × 2,448; 983 KB
-
.jpg/120px-Refreshment_Store_Room_South_Australian_Railway_Station(GN06710).jpg) Refreshment Store Room South Australian Railway Station(GN06710).jpg 3,264 × 2,448; 946 KB
Refreshment Store Room South Australian Railway Station(GN06710).jpg 3,264 × 2,448; 946 KB
-
 Restored South Australian Railways narrow-gauge bogie open wagon at Farina, 2021.jpg 6,000 × 4,000; 21.2 MB
-
 Robertstown Railway Station Sign June 2021.jpg 5,670 × 3,780; 5.42 MB
-
 Ronald J. Fitch, South Australian Railways Commissioner, ca 1970.jpg 1,010 × 1,237; 158 KB
-
 Route map of South Australian Railways Murraylands lines bw.png 2,507 × 1,998; 673 KB
-
 Route map of South Australian Railways Murraylands lines.png 1,670 × 1,281; 302 KB


–Port_Pirie_goods_train_timetable,_South_Australian_Railways,_1955.jpg)
.jpg)
.jpg)

.jpg)
.jpg)
.jpg)
.jpg)


.jpg)
.jpg)
.jpg)
.jpg)
.jpg)
.jpg)
.jpg)

.jpg)


.png)
.jpg)
.jpg)
.jpg)
.jpg)
.jpg)
.jpg)
.jpg)
.jpg)
.jpg)
.jpg)
.jpg)
.jpg)
.jpg)
.jpg)

.png)
.jpg)
.jpg)
.jpg)


.jpg)

.jpg)
.jpg)


_(NRM_RA14843).jpg)
.jpg)

.jpg)

.jpg)
.jpg)
.jpg)
.jpg)


_(State_Records_GRG7-128-5).jpg)
.jpg)

_at_Port_Pirie_ca_1950_(right-hand_side_of_SLSA_B_23640).jpg)
_at_Islington_Workshops_13_July_2023.jpg)

.jpg)

_1913.jpg)
_with_railway_lines_to_Alice_Springs_overlaid.png)


.jpg)
_station_yard_layout_diagram,_1912_and_1970.jpg)
.jpg)
_train_on_the_Great_Northern_Railway,_South_Australia_(later,_Central_Australia_Railway),_travelling_south_between_Hookina_railway_siding_and_Hawker,_about_1910.jpg)
_2016.jpg)
.jpg)
.jpg)
.jpg)
.jpg)
.jpg)
.jpg)
.jpg)


.jpg)
.png)
_1925.jpg)
_Port_Pirie_station_building_and_Budd_car,_Nov_1967_(Ken_Brine_NRM_1-3-s04692).jpg)
.jpg)


.jpg)


_with_East-west_Express_and_school_train_ca_1950_(SLSA_B_23640).jpg)
.jpg)
.jpg)
.jpg)

.jpg)
.jpg)
.jpg)
.jpg)
.jpg)
.jpg)
.jpg)
.jpg)
.jpg)
.jpg)
.jpg)
.jpg)
.jpg)
.jpg)
.jpg)
.jpg)
_track,_South_Australian_Railways.jpg)
.jpg)

.jpg)
.jpg)
.jpg)
.jpg)
.jpg)
.jpg)
.jpg)
,_Railway_Commisioner%27s_Report(GN12067).jpg)
.jpg)
.jpg)
.jpg)
.jpg)
.jpg)
.jpg)
.jpg)
.jpg)
.jpg)
.jpg)
.jpg)
.jpg)
_(cropped).jpg)
.jpg)
.jpg)
.jpg)
.jpg)
.jpg)

.jpg)
.jpg)
.jpg)
.jpg)
.jpg)
.jpg)
.jpg)
.jpg)
.jpg)


.jpg)
_on_South_Australian_Railways_Bluebird_railcar,_National_Railway_Museum_Port_Adelaide.jpg)
.png)
.png)
.png)
.jpg)
.jpg)